We toured a daycare facility yesterday, so Daddy thought we should try wearing shoes.

And here is bunny picture number ELEVEN. Hard to believe she is almost a year old! (for new readers, I have taken a picture of her with this same stuffed animal every month. It's a fun way to watch her grow.)

Yes, I have been managing to squeeze in some sewing time. This is the Baby K family tree row quilt. The blank space is for the other grandparents' photo. I was using up scraps, but started to repeat fabrics and then it ended up red and green. I am going to put horizontal sashing rows in and a small border in black.

This is a customer quilt that I took off the longarm this week. The top is the front of the quilt, and you can see my freehand squiggle designs on the solid backing. It was fun to work on this bright design!


 We couldn't let her play with it very long, because it is holding a silk bamboo shoot, which Baby K bit and started to shred. She does this with all her stuffed animals...takes a big bite and pulls off a mouthful of fuzz. I hope this phase ends soon! She is also chewing the bindings off most of her books :-(


 MQS Report:
 Next is "Northern Lights," by Janet Fogg, first place in the Theme category (theme was Timeless Stars, and the block patterns had to have been published in the Kansas City Star newspaper.) You can almost see the quilted snowflakes in the sky. The piecing to create the magnificent wolf was incredible.
 Finally, here is the Viewer's Choice winner: "Turnabout" by Claudia Pfeil, a quilter from Germany. As you can see, many of the winners are quilting intricate feathers in metallic threads on black backgrounds. I love the color gradients in this piece!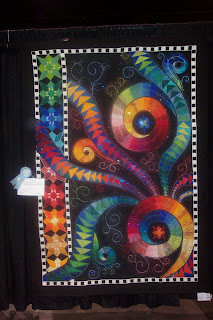


 Once the binding is attached to the front, I hand-stitch it to the back. If I were to attach the whole thing by machine, I would first attach it to the BACK of my quilt, then bring it to the front in order to cover the first seam. You can use a decorative stitch or a straight seam with matching/invisible thread for this option.
 To make a mitered corner, fold the strip vertically to the top of the quilt:
 Then bring it down, keeping the fold even with the edge of the quilt. You will have a little triangle "pocket" when you are done. Start sewing again using a quarter inch seam.
 When you have turned the fourth corner, stop sewing, leaving a substantial gap, and bring your quilt to a cutting surface. Fold both tails so they meet somewhere in the middle. Cut the extra binding so that one inch remains on the left, and 1.25 inches remains on the right.


