I have always been attracted to color-gradient quilts. I bought a rainbow pack of hand-dyed fabric to use when inspiration strikes.
This was a beautiful two-color quilt. I love the piecing, and the fabulous quilting in the alternate blocks.
On the quilting side, I pieced the back for the Row Quilt from some fat quarters in my stash. I made a big label with details about the photos that are on the front. It's important to document your quilts, and there is extra security in sewing them into the backing.
Here is some detail of the quilting. These are two of my favorite freehand designs. An all-over scroll and a "flame flower." I used the flame flower on the bright orange and yellow quilt earlier this week. The scroll is an easier background fill for me to do than meandering.
Baby K's new toy is a string of Hawaiian beads that I made on a cruise years ago. She can take them on and off herself and they make great noises on the tile floor.
4) a delightful surprise was the Vince Shute Wildlife Sanctuary, where they have an observation deck and feed black bears every night. We saw 4 babies in a tree, and about 6 adults at the various feeding troughs. 5) Of course, I did feed my fiber habit too. I added some Christmas fabric and batiks to my collection from the Quilter's Courtyard, and the yarn is Yarni, handpainted in St. Paul, purchased at the Yarnery. Both stores were charming.
6) Uncle Ty and Aunt Jean gathered some entertainment for the baby. Their next-door neighbor had this train toy for her grandchildren. Baby K loved it, and it has really enhanced her walking skills.
Sock update tomorrow!
13 ways Baby K tries to avoid a nap...It was a 40 minute process this morning...
If you are intimidated by quilting feathers, there are many books that you can look at. Then practice on paper! There are some tricks to getting the flow and where to backtrack, that's why I suggest a book or class. Kim Brunner and Cindy Roth were the instructors in the classes I took, and they both recommended the book "Infinite Feathers" by Anita Shackleford.
More quilts from the show. This is "Plain Ol' Nine Patch," by Kathy Ellzey. It's a small quilt, probably 10 by 20 inches, and it was in the thread challenge. Yep, all that color is thread and quilting designs!!
The picture I took of this whole quilt is pretty blurry...I need to take a deep breath and hold still when I take pictures I guess! You're just trying to hurry and stay out of people's way. All the animals were paper-pieced and the quilting was different in each block, very complementary to whichever animal it was.
MQS Report:
This quilt is called "Sugar and Spice," by Renae Haddadin, a winner in the category "Innovative Custom." The detail is breath-taking. Here you see the quilted cable/feathers in different color thread on a black background. Then, you see the other side of the quilt which is done on white fabric. It was spectacular.Next is "Northern Lights," by Janet Fogg, first place in the Theme category (theme was Timeless Stars, and the block patterns had to have been published in the Kansas City Star newspaper.) You can almost see the quilted snowflakes in the sky. The piecing to create the magnificent wolf was incredible.
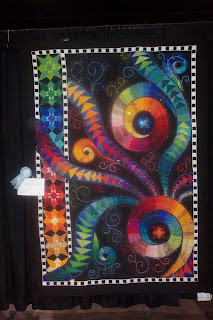
Finally, here is the Viewer's Choice winner: "Turnabout" by Claudia Pfeil, a quilter from Germany. As you can see, many of the winners are quilting intricate feathers in metallic threads on black backgrounds. I love the color gradients in this piece!
Baby K woke up at 4am with a temperature of 102.5! We took her in to the doctor, even though she has no other symptoms - first child syndrome ;-) Diagnosis: fever. Treatment: alternate tylenol and motrin every four hours. Of course, she only wants to be held, and even then she will cry for thirty minutes at a time...which is not a big deal in the grand scheme of things, but until now, she has been the happiest baby you've ever met, so this is a challenge for mom and dad!
Once the pieces are sewn together, you can flip them together into one continuous piece. At this point, it will be very obvious if you sewed in the wrong direction!! You should have a smooth piece that will exactly fit the remaining edge of your quilt. Trim the seam allowance, and finish attaching the binding.
Once the binding is attached to the front, I hand-stitch it to the back. If I were to attach the whole thing by machine, I would first attach it to the BACK of my quilt, then bring it to the front in order to cover the first seam. You can use a decorative stitch or a straight seam with matching/invisible thread for this option.
Binding is one of the tedious steps - but it has to be done in order to have a finished quilt! Quilt show judges pay particular attention to this - they also want to see the mitered corners sewn down on the front as well as the back. And some longarmers will attach the binding to the front of the quilt for you, which saves some time if you can afford the extra cost.

I had some wonderful teachers: Mary K and Faith, who work at my mom's shop. I think this is a fairly standard method for creating straight-grain bindings.
To start, I measure the perimeter of the quilt, and add 20. My current quilt measured 74 by 87, which is about 320 + 20 = 340. Divide this by 40, and that tells you how many strips to cut for your binding. I cut nine strips at 2.25 inches (two and a quarter). Sew them together on a diagonal (see part 2), trim the seam allowance and press in half.
I then take this looooong folded strip and sew the raw edge to the FRONT of my quilt, using a quarter inch seam. I start sewing in the middle of one side of the quilt, and leave at least a 10 inch tail.
When you reach a corner, stop a quarter inch from the edge, turn the quilt, and sew off through the corner:
To make a mitered corner, fold the strip vertically to the top of the quilt:
Then bring it down, keeping the fold even with the edge of the quilt. You will have a little triangle "pocket" when you are done. Start sewing again using a quarter inch seam.
When you have turned the fourth corner, stop sewing, leaving a substantial gap, and bring your quilt to a cutting surface. Fold both tails so they meet somewhere in the middle. Cut the extra binding so that one inch remains on the left, and 1.25 inches remains on the right.